Robotrio Behind the Scenes: Ace McNacho in 3D, Part 1
After revealing him on Twitter a few days ago, I'm proud to reveal what I've been working on these last few months: my sister Leena (Nephthys, for those who don't know) has hired me to do some 3D promo work for her original series, Robotrio! This
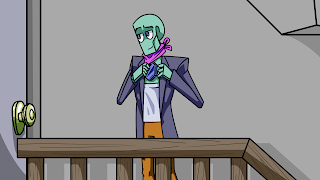
was quite a journey, so I'll be doing two posts this time, but before I show you how I got there, I'd like to lead with the finished product: Ace McNacho, P.D.B. (next to his appearance in the series' first character video; be sure to check it out!).
I first started Ace's construction without the outfit in mind, using some info Leena gave me on how his overall frame looked to take him into 3D. Given that much of the body was actually made of simple shapes like cylinders and rectangular cuboids, much of this was relatively straightforward, although the head was possibly the most complex shape on the model--so much so that it was the first item I attempted, just to be sure that I was able to make the character at all.
Using a variety of tactics, I worked on several potential heads for Ace, many of which got to a good starting point and never left it. The first head that I felt worked functionally for Ace was based on a few bezier curves that followed a number of 2D reference images; once I was finished with the curves, I converted them into traditional vertices and used them as a guide when extruding the head from a flat shape:
Pretty confident that I could model everything else if I could model the head, I moved on to the rest of the body, which was indeed far easier. Of course, there's no such thing as a finished product without concept art, so it was at this phase that, inspired by a particularly surreal tweet from Leena, I proudly(?) present the first 3D Robotrio video ever rendered:
Yes, those are 2D eyes stuck on in After Effects.
Ahem. Well, I think something about that violated the Zoomlian motto's position about evil geniuses (see point 7 here), so I'm going to clarify that, as with any medium, Blender carries the potential to be used for good or for evil and that this gives amateur computer animators like myself a responsibility to ensure that our use of Blender is done to pursue goodness.
Where was I...? Oh, yeah. Ace. After I added a shape key-powered mouth, added curve-based eyebrows, and finished a good rig, I got to work on the clothing! This was actually pretty simple in the grand scheme of things, but I was going to go all out: I was planning to use cloth simulations.I had heard of the "sewing" style of outfit, but the clipping that could result from that didn't work for me, so I decided to simply model the outfit as though I weren't going for simulations and slap a simulation onto it from there. (The pants, I decided early on, were better off as standard-rigged models.) One particular item that helped with this was the Solidify modifier, which let me add some thickness to the cloth's 2D edges.
A few cloth issues aside (among them inverted vertices causing the right coat sleeve getting sucked into Ace's arm), he was ready for posing! I whipped up a quick replica of Ace's office, and after a number of bake attempts of Ace's cloth simulation, I finally found one where there wasn't any visible clipping and set up a render!
Of course, there were a few issues with the look (including the lighting--the light on the bookshelf is actually brighter than the supposed light source from the window!), but I wasn't finished yet. I'd be making a few changes before Ace would be ready for showtime...


Comments
Post a Comment