Posts

Showing posts from 2021

Robotrio: Cast and Dant at Home

Image
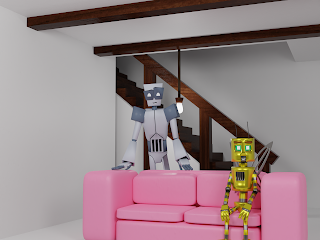
It was an excellent experience working on a number of posts for Ace McNacho's in-universe blog, and for my last post there, I wanted to add a little something special. With that in mind, right after the events of Robotrio's first season, here are Cast and Dant, both safe and sound! The first image was my pure Blender render, while the second reflects some changes I used in Gimp to add some depth-of-field style blurring and slightly change the lighting (I could've used Photoshop, but why not go open source?).     Among other things you may have noticed, I've (ethically) given Cast an upgrade! He now has new hands with three fingers, shoulders that can rotate independently from the torso, separated eyes that can allow for more dynamic expressions, feet (invisible though they may be), and a new mouth based on a tutorial Lei found for me ! In the future I'd like to make the house a bit less clean-looking to be more realistic (it looks more like a vacation house than a

810NICLE Day 2021: BIONICLE Logo Recreation

Image
For this year's unofficial BIONICLE celebration day (the blog post came a little late for August 10th, but I put it on YouTube in time), I decided to whip up a logo recreation in Blender, using After Effects for some fancier lighting/compositing. I was trying to recreate the rarely-seen animation at the start of this commercial: https://biomediaproject.com/bmp/files/vid/More/Promo%20CD%20Videos/BohrokSwarmIntro.m4v .    I felt some aspects could use a bit of work, particularly with the camera, but for the time allotted I think it turned out pretty well. This is also one of my first attempts at node-based procedural textures in a while, so anything that helps me learn is a win on my count.  The sound, as well as the reference video, belong to LEGO; thanks to BioMedia Project for archiving.  

Heracles Engineering Robotics Showcase: DANT-1C

Image
Exciting news: building on my promo work for Robotrio, we now have a showcase video for Dant! I worked on the writing, editing, and modeling/animation for this project, alongside some minor compositing/motion graphics and material work (although the more complex motion graphics were taken from stock video). I'd especially like to thank HahliNuva of Red Star Games for the cell shading used starting from the 30-second mark--which also marks the first time I've collaborated with someone else on a 3D project.   This is also the first time I've taken a hard look into node-based procedural textures, using them for the wood in Dant's stage (learning from a tutorial) and inspired by the game .kkreiger 's procedural work. Their lack of reliance on traditional textures makes them both convenient and future-proof, since deleting textures or even moving them (or moving the Blender files) will typically break image textures if they aren't packed.

Non Sequitur: The Great Peep Experiment

Image
Ever wonder what I do when I'm not working on VFX projects?  Me too.

Robotrio Behind the Scenes: Castilles in 3D

Image
The robo-racer Castilles arrives!  As with Dant, Castilles started out as a blueprint, just so I could get an idea of his exact proportions before getting to work. The blueprint served as a perfect reference as an in-Blender background; guesswork based on episode/short-based screenshots wouldn't have turned out half as well without a good 2D starting point.  Some factors, including his lower limbs and head, were notably easier than some of my other work, since they can easily be drawn from distorted and/or extruded cubes. The mouth, at least in Castilles' head was perhaps the easiest of the three, being a simple distorted cube. The mouth, at least in its current form, was done through an interesting mix between an armature bone for the jaw and shape keys for the overall mouth shape (and compensating for any weirdness that the first option leaves), meaning that all three robots currently have three different mouth styles.The canonically expressive visor, though, was far mor

Robotrio Behind the Scenes: DANT-1C!

Image
T he nature-focused diplomat bot from Robotrio, DANT-1C, has joined Ace in 3D! I'll keep my making-of down to one post this time, since I have a feeling I'll be able to move a little quicker here. I decided from the get-go that I should know exactly what Dant's proportions were, so I started designing an on-paper blueprint that fit Dant, keeping in mind his canonical height (3'6", for those who don't know). After that, I got to work!  Most of Dant was fairly easy, since he's mostly made up of cylinders. I had to change the ends of his forearms some to give his hands room to rotate, but most of his design stayed fairly identical to his 2D self. I suspect choosing how far one goes in realism vs. faithfulness to the original aesthetic is a challenge for many a 3D artist, although Leena informed me that I should stick with a fairly literal translation of the original art style wherever possible (i.e. the arms and legs' stripes shouldn't be individu

Good Friday

Image
 As a hobbyist 3D artist, I would recommend doing projects you really care about--not in a fandom kind of way, but nothing is going to take you as far in your creative endeavors as doing something that really, personally matters. I've been doing images Good Friday on and off since 2015, and it's helped me to delve deeply into some topics I wouldn't have normally felt the need to research, including nodes and volumetric materials. 3D is a medium that can be used for worship like any other, so why not dive in and go all the way?     I decided to lean more towards allegory in recent years, switching from emphasizing accuracy itself to depicting the more cataclysmic event that the Crucifixion is at its core--the reuniting of Heaven and Earth and the unwriting of the rules of death. One doesn't have to abandon a realistic art style in order to convey this sort of symbolism, so I decided to give it a try. Decided it would be best not to go into much technical detail this time

Robotrio Behind the Scenes: Ace McNacho in 3D, Part 2

Image
When I last left off, Ace didn't look bad, but there were a couple of issues. First off, at this point the color scheme felt extremely desaturated (see left), despite my choosing the exact colors--to the pixel--of the non-shadowed areas in Ace's character reference sheet. I consulted Leena about it, and it turned out that 2D Ace's darker colors were more saturated than his lighter colors, which helped the 2D image "pop" more. Sure enough, once I darkened and saturated Ace's coat to something of a mix between the two values, it looked much closer to Ace. Another issue was the lighting; the "window" was set up to emit light, but it was emitting a remarkably small amount of it--enough so that the fake lighting of the bottom-right corner was brighter than its "source." With that said, this was a pretty easy fix, and scaling the scene down to be closer to Ace's canon height forced me to redo the lighting anyway. The biggest change was

Robotrio Behind the Scenes: Ace McNacho in 3D, Part 1

Image
After revealing him on Twitter a few days ago, I'm proud to reveal what I've been working on these last few months: my sister Leena (Nephthys, for those who don't know) has hired me to do some 3D promo work for her original series, Robotrio! This was quite a journey, so I'll be doing two posts this time , but before I show you how I got there, I'd like to lead with the finished product: Ace McNacho, P.D.B. (next to his appearance in the series' first character video ; be sure to check it out !).   I first started Ace's construction without the outfit in mind, using some info Leena gave me on how his overall frame looked to take him into 3D. Given that much of the body was actually made of simple shapes like cylinders and rectangular cuboids, much of this was relatively straightforward, although the head was possibly the most complex shape on the model--so much so that it was the first item I attempted, j

Kollege Ketchup: Photoshop! Part 2: Everything Else

Image
Let's jump right in! My second project was to create a "painted" book cover; interestingly, this took things beyond the simple filters I'd been anticipating, instead focusing on making little smudges on the image to get the individualized effect of actual brush strokes.       My next project required me to add myself in a historical photograph; while I'd usually go for something tongue-in-cheek, I ultimately went for the Vietnam War instead, requiring a more somber tone. I settled on the Layer Styles panel's Inner Glow option to help blend myself into the photo a little more, while using a Levels adjustment layer to get the lighting into place.  If memory serves, I believe I also went for a layer of noise over the entire image, and while a more prominent shadow would have been helpful here, I was able to get some of the grass in front of my feet, which also helped.         The class' final assignment concerned motion blur. Similar to the "painting&quo

A Bit on the ABYDOS: Incursion OST (Including the Instruments Used)

Image
Composing was pretty much the last step of the movie in my workflow, although that was more of a guideline than a rule. While I can see a couple things that I could have done differently, I'm actually pretty happy with how it turned out--and, perhaps more vitally of all, if I waited for the soundtrack to be perfect I wouldn't actually ever get the movie released.  Anyway, given my blog's early emphasis on project-making resources, I decided to showcase what I used to make the soundtrack for ABYDOS: Incursion! Below is everything I used to compose it; all of them are free in some form (although some carry a couple caveats), because my approach to whether I should grab software really hasn't changed in the last eight or nine years of this blog. Composing software/DAW used: LMMS (free and open source) Instruments used (NOTE: The below license descriptions only apply to making music with the downloads, not modifying/redistributing the files themselves. Also, while I've

Blog updates!

It's occurred to me that I've had the same basic theme since about... 2014. (And that was when I switched from Picture Window: Shade to Picture Window: Open.) While I've redesigned the blog every few years, most of that's been renovating the backgrounds and coloring, if with some fancier additions like gradients via CSS.  With a new decade officially in place and responsive design more important than ever, I decided it's time to fully redecorate! I'll admit I wasn't as big a fan of the default Contempo on its own, but with some CSS, the gradients and transparency are back and the ABYDOS -influenced color scheme is far more consistent across the site! I'll eventually replace the background and header images (the latter image was first rendered in late 2014), but I thought I'd keep them for now to transition the theme more smoothly. In the meantime, I've been working on a couple of other projects I'm quite excited about (not related to ABYDOS),