Posts

Showing posts from 2012

K12 Project and Assignment 6: Build and Shape a Car

Image
I’m finally catching up on all my blog posts!  I’d hardly had any time at all to blog between K12′s Blender and k12′s Japanese, but thanks to winter break I can catch up here. Anyway, for project 6 I used an entirely new way of modeling: starting with a grid, stretching it into a 2D car shape based on an image file, and using extrusion to make it a 3D object.  As a little addition, I dragged the Monkey from projects 3 and 4, putting it in a driving position.  For the assignment, I was supposed to reshape the car, make it smoother and add some more parts.  My addition there was adding actual lamps for my added-on headlights.  Here they are:
Intermission: HAPPY END OF THE WORLD DAY!

Image
Well, I do tend to be a little bit original with my celebrations.  I even came up with a song for this one! On the first day of Doomsday my true love just told me that the Earth exploded on the TV!  On the second day of Doomsday my true love just told me that there were two giant earthquakes and that Earth exploded on the TV! On the third day of Doomsday my true love just told my that there were three exploding cars, two giant earthquakes and the Earth exploding on the TV!  On the fourth day of Doomsday my true love just told me that there were four hurricanes, three exploding cars, two giant earthquakes, and the Earth exploding on the TV! On the fifth day of Doomsday my true love just told me: there were FIVE KAIJU THINGS!  Four hurricanes, three exploding cars, two giant earthquakes, and the Earth exploding on the TV! On the sixth day of Doomsday my true love just told my that there were six alien landings, FIVE KAIJU THINGS!  Four hurricanes, three exploding cars,

K12 Project and Assignment 5: Build a Terrain and Another Terrain

Image
But first, an update on the K12/k12 argument: The logo looks like a lowercase “k” to the twelfth power.  However, given that company names are proper nouns, it would then be capitalized.  So now, the only question is this: do we side with the logo or the grammar?  Hmmm… Now then, for project 5, I was supposed to use a stencil texture to make two different textures appear on the same object.  Here’s an example: Here, I made a pink cloud texture and a “magic” texture.  I then used a striped stencil texture to make the pink clouds seem to be striped over the magic.  Essentially, stencils “cut” a texture to make another one show. Well, that was what I was supposed to do for my ground with two image-based textures.  Here’s my standard terrain: I created the hills and valley using Proportional Editing, a useful tool that smoothly forms an object to look more like, well, hills and valleys.  Here’s how it works: when I move a vertex, it automatically moves other vertices arou

K12 Project and Assignment 4: Animate a Creature and a Monkey

Image
Sorry for the slow blogging–between my Blender classes on K12 (or k12?) and Japanese on the same system, I’ve hardly had much spare web time at all.  Now then, back to the namesake of the title of the post of the blog of the guy. As mentioned, I’ve animated my creature, “Jason the Jumper,” who is not jumping–merely walking.  I realized that I like to do a lot of background stuff, adding a soda drink, table and ground.  However, I did give Jason a path to follow.  I wanted to have him go up and down while running, but I decided it’d just be a lot of trouble for very little benefit. Second, my Assignment: Animate Suzanne.  This one I had a little too much fun with–it was more work.  However, this turned out as possibly my most difficult animation yet–I made the monkey flip.  I used both a path and manually moving it.  It’s hard to notice, but I also made a short path for the camera to follow–going down and then  zooming in (something I had to do to make sure the video c

K12 Project and Assignment 3: Build a Creature and a Monkey

Image
Did you notice I have no idea if the “k” in K12 is capitalized or uncapitalized?  See, in the last sentence, k12 was capitalized.  Yet in that previous sentence, K12 was lowercase.  And yet, in that previous sentence… well, you get the idea.  Anyway, Project 3 introduces modeling , and taught me something new–using a bump map texture; which makes the object look, well, bumpy.  It’s interestingly called “normal” in the influence section of the Texture panel.  My special addition for this project was using “emit” (same section, same panel) to get some parts of the creature to seem to glow.  Upon noticing that it wasn’t a huge change (as well as my not being able to see its eyes), I also changed the camera angle and provided some more lighting.  I actually noticed then that it looked like he was jumping down, so… well, I suppose a picture’s worth a thousand words. “Jason the Jumper”, as I call him, uses particles for the crashing-glass effect  The particles are on billboard

k12 Project 2: Build a House UPDATED

Image
I have now added Assignment 2!  Now, I’d like to clarify some details about my Blender classes.  There are actually two parts of each assignment.  The first one is something you must do aided by a walkthrough of each step (or “projects”–Suzanne was the last one) and part two is when you are told to do something and are shown the minimal requirements (which are just called assignments–the eggs).  Now here is my second project: build a house.  This involved constraining my camera to a path, which I believe is part of the parenting family. Paths are new to me; I just learned them during the class.  A path is a one-dimensional line that can’t be seen while being rendered (made into a picture/movie), and one can constrain any object to it to make the object follow it.  Anyway, my “special addition” to the house is: interior decoration! What, adding a table and a Minecraft-inspired bed isn’t enough for you??  *Sigh*. okay, whatever you want, but… UPDATE: I now have rea

My Blender Classes Have Started!

Image
This actually happened some time before this post.  As I said earlier, I’m taking classes of Blender using K12.com, and quite a few of my posts will from now on have to do with the assignments I have to do.  Starting with my first assignments: “Put a hat on a monkey” and “Put a dozen randomly sized and rotated eggs in a carton”.  First is Suzzane: I used my “assign multiple materials” trick from the previous post for the eyes and pupils, and I also used the “Mirror” setting on the Materials properties (no relation to the Mirror modifier) to make the ground reflective.  Interestingly though, I had to be careful about how reflective I made the plane, as too much would completely reflect the sky, which would make it seem like there was no plane at all: Quite interesting, but not the goal of my activity.  As a side note, the stars don’t seem able to be reflected. Second of all (some of you who read Zoom Times may already know this): Eggs.       What the teachers wanted me

Isle of the Mutant Monkeys!

Image
Finally, more pictures of my real modeling!  This post will, as well as showing fun images, involve technical details.  Anyway, this picture uses particles.  I’ve toyed with them before, but I had no idea how to make it work.  It turned out all I had to do was render it!  Particles, among other things, are good for fires, explosions, etc.  Although it appears inconsequential, one of my biggest knowledge boosts was (with the help of my book, which can be Herculean to understand sometimes anyway) assigning multiple textures to the “transporter.”  My problem in previous attempts was pressing the “New      +” in materials, when for more than one in one object I just press the overlooked “+” button near the New Material section. This next one is probably one of my favorite creations: a self-made movie poster! I highly doubt I’m going to make it a real movie, or even a short animation, but still quite fun.  This is not my first project to use light for reasons other than, well,

Isle of the Mutant Monkeys (Game)

Image
Well, more like mutant monkey heads. The original concept of this was from my brother, who also designed most of the monkeys and the background himself.  You see, Suzzane the monkey (shown here) is one of Blender’s primitives, so we just couldn’t resist mutating them awkwardly.  My Yoda post used a “mutant monkey” for the head. Suzzane, an “Easter egg” made exclusively for Blender. Anyway, I did everything I could to make the file a testing for one thing I was experimenting with: the game engine.  I used this for both first-person and third-person games.  The third-person didn’t use advanced movement (they were floating heads) but I could still make them fly around and respond to my keys.  There is a way to make the cameras follow the objects (parenting, which allows certain objects follow other objects) but I wasn’t interested in that at the moment.  Instead, I turned my work to first person, which–surprisingly–turned out to be a lot easier. There is also a way to assi

Update (To the Software and Hardware, as Well as the Blog)

First of all, our friend, Mr. Bill, just got me a new computer built for graphics!  Including an updated version of Blender, I am now able to build and render images much faster! Second of all, I am now attending an online course teaching Blender!  This should teach me the ins and outs of Blender in a flash! http://www.k12.com , an all-subject online teaching site.

I'm Back! (Again!)

Image
I did bring my laptop this time, but the problem was that since I didn’t have Blender or Sculptris installed, there was really nothing to blog about .  However, there was one thing I had: Photoshop.  Some of you may remember my family portrait earlier.  I’ve done a minor update on it–namely, not cutting off part of my sister’s head and shoulders (while Photoshopping the Prime Minister, who was taking the picture, into the photograph. For those of you who haven’t seen the previous post, I’m the fellow in the orange shirt and the fish pendant): I also took the liberty of putting our other four siblings, Hope, Jean, Regina and Mary, in there as well. Or perhaps you’d prefer Choclo and Zorg wielding lightsabers? I’ve experimented with a few others, though I’m sure I can post these later (this is the short version, really!)

DONE!

Image
Finally!  After weeks of trying, I’m finally done! Well, you may have been expecting something better, but it was an achievement for me.  I ended up loading and re-saving the sounds as .WAVs on WavePad Sound Editor, which is, well, a sound editor.  After that, it was easy to just add the sounds on a movie editor (Windows Live Movie Maker is the one I used).  Once I learn more about particles and such, I may make a more advanced version with an explosion or two.  Also, now that I know how to make sounds, I can now probably make much more advanced movies–probably longer ones, too. And believe it or not, you may not hear from me for another week, as I’m going on vacation soon.  I’ll bring my laptop this time, so I may blog from there.

I'm Back!

I have returned from Summer Camp and I am back.  I know I haven't been posting pictures lately, but soon I'll be ready.  The hardest part about mixing the audio and the video of my movie is that I "borrowed" the sound effects from Bejeweled 2, and that those sound files, .OGGs, weren't meant to operate on anything except the game [2018 update: whoops; turns out .OGG is a more common audio format than I'd thought, so I must have run into a separate issue, or else it was just too obscure for Blender's notice at the time].  However, I recently figured out that I may have been doing it right some of the time.  You see, when I made a video with only audio/only visual, I think I created both at the same time--two files, the sound and the sight.  I think I'll be able to mix those together without much problem at all. By the way, another Non Sequiter ... Ι γαν σπελλ Βλενδερ ανδ Σγυλπτρισ ιν Ενηλισθ γθαραγτερσ! Blender and Sculptris in English char

The Answer!

After taking quite a long time studying my book, digressing on world domination schemes and trying more combinations of codecs, I finally got my answer on a forum I'd posted my question on.  The answer was that I could just insert the sounds after I finish rendering.  He also said that the error message means that I've chosen "bad parameters." I have no idea what he means, although I may have a small idea on how to fix it... but then again, I'll probably end up going with his suggestion: put in sound later (I've finished the animation).  There may be yet another long pause since I'm leaving for summer camp soon--a non-computer activity. However, now that I've mostly solved the problem (thanks "Stiv"!), I'll try to post more frequently. On another note, I got a Bamboo pen & pad for my birthday which (when I figure out how it's used) can dramatically improve using Sculptris, and may help with Blender too!

No Power? No Animation.

Very busy Summer.  Friday's storm went up, my computer had no electricity, I'm still working on turning our lightning rod into a power supply, and I've still not found out the correct codecs (forms of encryption) for my animation.  However, I have an advantage now: I have the Blender for Dummies book (which I've looked to several times in a row now--don't tell anyone) and I should have a bit less trouble here.  Any other Blender users can also comment all they want so I can read them and then delete them before anyone notices .  Hope to fix it soon!

Non Sequitur

I can spell Blender and Sculptris in Greek characters! Βλενδερ ανδ Σγυλπτρισ ιν Ηρεεκ γθαραγτερσ!

Update (on the blog, not the software)

I noticed I haven't been blogging lately.  For Summer, it's been a busy time!  Keeping the blog up-to-date, I said earlier that I was working on an animation more serious than the others.  The primary difference here is that this movie will include sound , which was not in any of my previous ones.  This is harder than I thought, mostly because: a) only certain output settings show the "Encoding" section that handles sound, b) a lot of the encoding options say when you try to render, "Error initializing video stream" and then there's c) when the right combination is finally reached, there's either no audio or no visual.  Either way, then despite its also being 4 seconds long, I think once the problem's solved it'll be worth the (reeeeally long) wait. On another note, I've started helping to teach some of my family members about Sculptris!  Soon now,  I'll be able to show off show you their stuff as well as my own! On yet

The “How To”s and “How it Works”s of Sculptris

I’ve shown what Sculptris can do, but I haven’t really said how it does it.  Well, first of all:  Sculptris isn’t a computer animation program.  Really.  It’s an advanced computer modeling program, but at least as of my current knowledge it doesn’t make the objects you create move .  Nor, I believe, can you even save them as JPEGs (universal picture files, for those of you who don’t do technical computer stuff).  However, you can export the files as OBJs (universally compatible 3-D files) and import them to another program, say Blender, and save some files as JPEGs from there.  And you can modify your objects there, too. When you start Sculptris, you start out with a gray sphere made up of triangles.  With this preset you are given nine basic controls.  I will try to explain those which are not self-explanatory:  Crease, Rotate, Scale (which scales up or down anything within your circular selector), Draw (opposite of crease; coloring is entirely different), Flatten, G

But what about Sculptris?

Image
Sorry for the slow blogging! I noticed that I said earlier, "I use Blender and Sculptris for my animations".  I have done tons of posts on the former, though hardly one on the latter.  This is mostly because I use Blender far more often and hardly use Sculptris at all, though it most certainly needs at least one post to itself. First of all, Sculptris has a different interface than Blender and Maya and all that, so to speak.  It views itself as "clay" that you can sculpt to your leisure.  You can do a lot of cool stuff with it, but, being an amateur, I did this simple model first: Well, it's about as easy as modeling goes, but as least it's something.  After that, I decided to do Blinky and the gang! I did the background in Blender, but Pac-man and the ghosts are from Sculptris. http://www.newtek.com/lightwave/ , another animation program, is the link of the post.  I don't actually think there's anything else to say here.  However,

Blender 101 1/2: the Physics Engine

Technical alert: this post explains how to do things in technical detail; you can skip this post if you're not interested in that kind of thing. Now, I am an amateur as you could see by some of my models, but nevertheless I also like teaching others about what little I know about Blender and other 3D software.  Today, the physics engine is my focus. There are seven different types of physics in Blender.  Force Field can make things like wind, tornadoes and, well, force fields.  Collision is necessary for projects that involve gravity--which would include clothing, floors, objects... basically anything in an advanced project.  Cloth makes your object turn into, well... cloth.  Fluids and Smoke also speak for themselves, and I have no idea what "Dynamic Paint" and "Soft Body" do. The physics engine is absolutely necessary for any advanced project; if you want snow to move around, that's a good time to use Force Field; Collision can help if yo

A Random Guy

Image
I believe that I’ve told you about Modifiers in a previous post.  You also have the opportunity to change the sky color, as I did for this poor fellow, who was also made using the “Gus” formula.  I have yet to figure out what all those triangles are on his head; my guess is that it has something to do with the lighting, his angled head and a shadow?  But anyway, today’s link of the post is http://usa.autodesk.com/maya , the website of Autodesk Maya, which I don’t have with me at the time (hint: it costs more than zero bucks) but I hear that a lot of other animators have it, so it deserves a mention here.

How to Photoshop: 3 Tools to Have Fun With First

Image
I realize very few of you have Blender, but Photoshop is much more common in users.  Therefore, I have decided to tell about what the most useful tools are (or rather, what I tend to use most often--different users are free to do their 'shops in different ways). 1) The most basic of all, the brush allows for simple fun stuff-making.  Good for lightsabers, "glowing" effects, stuff like that. 2) Liquify, which one can use on on particular spot  (e.g. elf ears and completely messing up frowns and smiles) or on the whole thing (which I used for the background of my me-vs-three-evil-clones star wars picture). 3) The magnetic lasso tool.  Some just use lasso and leave it at that, but also available are the polygon lasso tool (selects using lines) and magnetic (my favorite--selects by "sticking" to similar colors to help select one particular person, object, etc).  Anyway, it helps you to select stuff so you can move it from a family photo to an anci

I Forgot!

Image
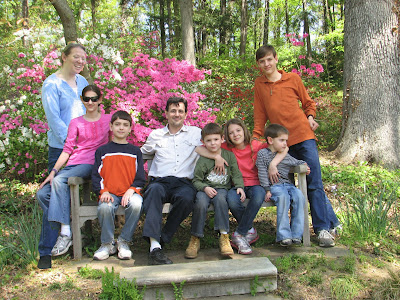
All this time I haven't given you one high-definition picture of myself!  That's okay, since you probably read some of Mom's blog and already know, though for you few non-ZoomTimers I'm going to include a family picture.  Just so you know, I'm the dashingly handsome incredibly intelligent really bad at describing himself young man in the orange shirt and the fish pendant. The Valtapaz Family From left: The Prime Minister, (the white and blue dot is the new baby Mom's expecting!), Princess Klenda, Zorg, The Grand Emperor, Choclo, Leena, Oob, and myself, Mxyl, an abbreviation for Mxyzptlk.  I also go by That Really Cool Guy, Motym, The Hazard-Master, and several other unique names I'm not going to display here that involve my real name. Cheers, --Multiple names.

Computer Hacking

Here it is… The link of today’s post is the site of the bestseller game, Bejeweled 2 ! What, surprised?  It was the first “real” computer game we ever had! Ahem.  Well, to tell you why I put up nothing related to PC animation, Photoshop etc., I have been digging into this particular program and have brought up the backdrops as usable JPEG images!  For computer nuts who want to try this themselves (assuming you bought the full version), you can go to (for Windows) ‘My Computer’>’OS (C:)’ or ‘Local disk (C:)’, depending on the version>’Program Files (x86)’>’PopCap Games’>’Bejeweled 2 Deluxe’>’images’>’backdrops’.  If you have not yet bought the game but have a Windows 7 computer, it should have a trial version installed already.  If you’re interested in using images from this trial please ask me about it in the comments.  I used these background images for my Photoshops–it’s way safer than just browsing the internet for “alien backgrounds.” P.S. And

Gus

Image
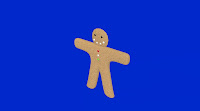
This is the first Blender object most people are going to create: “Gus the Gingerbread Man”.  I’ve mentioned him before; this model takes advantage of Blender’s “Extrude” function; if you’re interested you can see instructions for it here . What it wanted was this: What I made was this: It accomplished its goal (helping me learn more about Blender), but I believe it was not the best model of a gingerbread man.  What I believe I did wrong was I didn’t activate “Limit selection to visible” while modeling.  This caused all kinds of problems (All of the main body except the back is 2-D). Gus the Gingerbread Man, Scene one, Take: 2! Well, it’s better than last time… I still thought it could use a face lift.  It still looked far different from the example. Gus the Gingerbread Man, Scene one, Take: 2 1/2! I liked this one.  Just a few adjustments + better lighting + depth added = win.  And yes, I do know real gingerbread men are flat.  Not to mention I added armatures, p

Modifiers

Image
Sorry for not blogging for so long!  I was out camping at Mattaponi, where I don’t tend bring my desktop.  Not even my laptop.  Or even my iPod.  Or even my Take-Over-The-World-O-Matic .  But anyway, on to the blog.  This also contains technical stuff, by the way. Well, moving on to the fun stuff, using the same basic modeling technique as building “ Gus the Gingerbread Man ” (my picture of whom is below-left), I have made a pretty simple rendering, “A Guy” (below-right). However, I shortly realized a number of ways to change the background in little ways that can make the effect much more dramatic.  “Mist” actually cheats on its job by making farther away objects more transparent (much faster rendering than particle systems or that complicated stuff), and it makes for a very realistic effect.  Stars is even less complicated, scattering the background with little white dots.  Tip: be very careful about which effects you use and to what degree; too many cooks can make for

ParticleIllusion

Image
This time, I’m going to do my link of the post first: www.wondertouch.com .  This is the home of ParticleIllusion, a $300 2-D special effects software.  It took me a while to get used to the frames, and only a while after I got the hang of it, the trial ran out.  Yes, from what little you know about me, you could probably tell I got the (free) 30-day trial.  ParticleIllusion does not record sound (which I found more than a little annoying) so you may not want to get it if you want full-fledged movies, but nevertheless it’s nice for fun little things as a hobby (e.g. the movie I made of myself below–you may recognize the girl in the background as Leena from the photoshop post). Sorry all my videos are so short, but the better I get at these things the longer and more complex my movies will get!

The Technical Stuff Behind Yoda

WARNING: As the name says, this deals with the technical stuff behind the creation of Yoda.  If you aren't an amateur computer animator or just aren't interested, you can just skip this post. Well.  Going back to Yoda, I may as well start at the beginning: Mark I.  This model was pretty simple.  Lay out a plane as a backdrop, scale five cubes to get his feet, arms and torso, two more cubes for his lightsaber, some cones, spheres and cylinders for the background and party hat, and his head was just an extruded monkey head that's added in to Blender.  Quite simple, in fact the arms aren't even the same color if you look closely enough. Now to Mark II (or I.V, or whatever you want): the movie.  By then I'd fixed the different-arm-color problem, scaled up the backgroud a bit and learned how to render, though the biggest change in my opinion (other than its being a movie instead of a picture) is the addition of disco.  I added (painfully) multiple lights

And More on Star Wars...

Image
Today I’m talking about Photoshops, when you take something that really happened & recreate it digitally because you forgot to take a real picture.  It started out when I was awkwardly warped into the Star Wars universe during the Sith Wars (thousands of years before Episode I), handed a lightsaber, and told to go to a planet to destroy an evil version of me, who also warped in from a different universe.  I didn’t have a camera, so I later recreated it the best I could on photoshop: And what’s more, the same thing happened with my siblings… Klenda got into a saber clash with her clone (not too wittingly as they both have equal strength), Zorg fared well against his (and he stole Mace Windu’s saber, in case you were wondering–never mind that he wouldn’t exist for another few thousand years), and Leena, stuck with two evil clones, just sat back and watched them kill themselves off.  After that was done, then what happened?  You guessed it: I got stuck within time itsel

Yoda

Image
Finally, what I promised: showing off! When I first downloaded Blender, I didn’t know how to do anything other than just scale cubes in odd ways.  Then, after the manual I was reading told me how to actually ADD stuff, I really got going!  I am going to show you my first project ever from before I even knew how to render:   Yoda on Dagobah.  How cool is that?  The general idea here was just to see what I could do.  I remember creating a picture of the interior of his hut (complete with a painting of his glory days–him with a purple mohawk and electric guitar), but I think I deleted it by accident.  But the good news is: I made a video of him!  And I included disco lights!  It’s only about 3 seconds long, but still: After a while I kept working on him between projects and despite the glitches with his clothing I think I got something here with my latest prototype: Today’s link-of-the-post: www.pixologic.com !  This can both give you the free Sculptris and the not-so

What I Use for my Game-creating and Animations

Image
I use Blender & Sculptris for my animations.  That’s it.  This post is so small it doesn’t even have a link-of-the-post. Ok, so maybe I should make this a bit bigger… First of all, I should talk about one of the things teenagers demidolts* should be interested in: video games.  I  have already changed my mind about no links & instead made there several links.  First, I started “making” computer games with a program called Kodu .  Kodu’s mascot–some sort of robot named Kodu. Kodu is a free (assuming you log in, etc.) 3-D computer game-making software for simple programming.  I goofed around on that until I ran into Scratch (which is also 100% free).  At first Scratch seemed to be more work for less stuff (e.g. it can only make 2-D games), but I actually figured out that Kodu was more limiting than Scratch, not just easier.   And after that, I got into Blender, which is (you guessed it) also free, and it has its own built-in game engine.  It’s even more complex t

Welcome to the Blog of an Amateur Computer Animator!

First of all, I have to tell you, the title of the blog is totally deceiving.  This is the blog of a junior computer animator , not a group of junior computer animators.   However, why I named this “jrcomputeranimat or s .wordpress.com” is because all of you younger guys (or older guys; I’m only 14 here) can come here for suggestions and great links to digital animation sites. Now that that’s all clear, the second thing is that this is not only computer animation.  It also includes stuff from Photoshop and a bit about book writing, since I sent in a query earlier and plan to have it published.  Then why didn’t I name this blog, “www.jrcomputeranimatorsandphotoshoppersandpotentalfutureauthors.blogspot.com”?  I dunno.  Go figure.  But rest assured that this blog will mostly be about its namesake: computer animation. And then one of the last things: why do I even run this blog?  The answer is a combination of answers: 1: A friend of my Dad’s who runs his own computer-anim